


How To Steam Milk for Latter Art?
Steaming milk for latte art looks simple, but it’s where most results fall apart. The difference between flat foam and clean patterns often comes down to texture control. You’re not just heating milk. You’re building a smooth, glossy microfoam that can flow naturally with espresso.
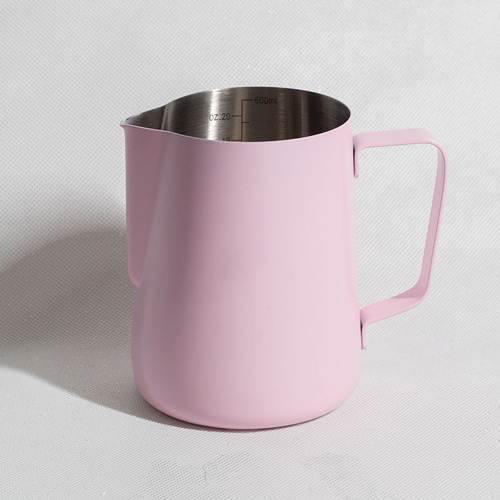
A good Milk Pitcher plays a big role here. The SENGHO milk jug in 350ml and 600ml sizes is designed with a precise spout and balanced body, which helps control pouring speed and direction. That becomes important when you move from steaming to actually creating latte art.
What Texture You’re Really Trying To Achieve
For latte art, the goal is not thick foam. It’s microfoam. That means tiny, uniform bubbles that are almost invisible. The milk should look glossy, like wet paint, and flow smoothly when you tilt the pitcher.
If the foam is too dry, it sits on top and won’t integrate with the coffee. If it’s too thin, it disappears into the espresso. The right balance allows the milk to blend and then sit on the surface at the right moment during pouring.
This is where many beginners struggle, but it’s also where consistency matters for coffee shops and equipment buyers. If staff can’t repeat the same texture, the drink quality becomes unstable.
How The Steaming Process Works
Start with cold milk.
Cold milk gives more control time. Fill the pitcher to about one third or half, depending on size. A 350ml or 600ml pitcher gives enough space for expansion without overflow.Position the steam wand just below the surface.
At the beginning, you want to introduce air. This creates the initial foam. You’ll hear a light tearing sound, not a loud splash. Too much noise usually means too much air.Lower the pitcher slightly to stretch the milk.
This stage should be short. Just enough to create fine bubbles. Overdoing it leads to thick foam, which is hard to use for latte art.Submerge the wand deeper to heat and spin.
Once enough air is added, move into the heating phase. The milk should start spinning in a whirlpool motion. This breaks down larger bubbles and smooths the texture.Stop at the right temperature.
Around 60 to 65 degrees Celsius is the usual range. Too hot, and the milk loses sweetness and texture. Too cold, and it won’t blend well with espresso.
Why The Pitcher Matters More Than Expected
Many people focus only on the coffee machine, but the milk pitcher affects control more than expected. The shape, size, and spout all influence how milk behaves.
A well-designed spout helps guide the flow when pouring patterns like hearts or rosettas. A balanced body makes it easier to control wrist movement. The SENGHO milk jug is designed with these points in mind, which is why it fits both beginner training and commercial use.
For B-end buyers, this becomes a real issue. If the pitcher design is inconsistent, staff training takes longer, and results vary from person to person. That directly affects drink presentation and customer experience.
Common Mistakes That Affect Latte Art
One common issue is adding too much air. This creates large bubbles and dry foam, which sits on top of the coffee instead of blending.
Another issue is not creating a proper whirlpool. Without that spinning motion, the milk won’t become smooth. You end up with uneven texture, which makes clean patterns almost impossible.
Temperature control is another factor. Overheated milk loses its structure. It becomes flat and hard to work with. Underheated milk lacks body and doesn’t hold shape during pouring.
These problems show up quickly in busy coffee shops. When speed increases, small mistakes multiply. That’s why consistent tools and clear processes matter.
How To Improve Consistency In Real Use
Consistency doesn’t come from one step. It comes from repeating the same process with the same tools.
Using the right pitcher size helps control milk volume. A 350ml pitcher works well for single drinks. A 600ml pitcher is better for larger servings or back-to-back preparation. Matching size to use reduces waste and improves control.
Keeping the steam wand clean and positioned correctly also makes a difference. Small changes in angle or depth can affect the final texture.
For coffee businesses, training is easier when the equipment supports the process. A stable, well-shaped pitcher reduces variability, which helps staff reach consistent results faster.
Why This Matters For Buyers
For distributors, café suppliers, and coffee equipment buyers, milk pitchers are often treated as small accessories. In reality, they directly affect drink quality.
If the pitcher is hard to control, staff struggle to create consistent latte art. That affects how drinks look and how customers perceive quality. Over time, this impacts brand image, especially in competitive café markets.
Choosing a well-designed milk jug helps reduce training time and improves repeatability. It’s a small product, but it plays a clear role in daily operations.
Conclusion
Steaming milk for latte art is about control, not just technique. The goal is smooth, glossy microfoam that blends and flows naturally with espresso. Getting there requires the right process, the right temperature, and the right tools.
If you are sourcing milk pitchers for your business or product line, it’s worth choosing a design that supports consistency and ease of use. If you need help selecting the right size or style for your market, feel free to reach out. We can help you find a better fit based on your actual use scenarios.